- Subscribe to RSS Feed
- Mark as New
- Mark as Read
- Bookmark
- Subscribe
- Printer Friendly Page
- Report Inappropriate Content
on 03-08-2022 06:53 AM - edited on 03-02-2023 10:12 AM by intapiuser
Capturing accurate business transactions is imperative in understanding business operations.
If data is constantly changing, such as being deleted or updated, how do you ensure your Elasticube is in sync with your data source?
Depending on the use case, sometimes “Replace All” data could be an option, but that might not be the most efficient option if you have a huge amount of data. You also have “Accumulated By” as an option, but that could result in duplicated records and deleted records still being shown in Elasticube.
Given these potential results, another path you should consider is a custom code solution.
Custom Code Solution
Leverage the demo below to learn more. Note in the demo, we will be using an oracle database with a transaction table. The transaction table has an updated_date column that captures the latest data changes and an audit table where deleted transaction IDs are stored with timestamps via a trigger. Please note, all tables in the demo contain dummy records.
You can find the DDL for table and trigger here.
Using custom code to create new tables in Elasticube will allow the Elasticube to be in sync with your data source table. This new table will only show the latest records, while also removing any deleted records via trigger. The audit table will capture deleted records. (NOTE: Adding triggers could impact database performance as every time a record is deleted there needs to be a write operation).
Additionally, this custom code solution provides the ability for change data capture (CDC) to answer business questions like at what intervals the record was updated and/or deleted via the audit table.
Let’s begin by building an Elasticube. Use updated_date as “Accumulated By” for both the tables and build the Elasticube by selecting BY TABLE. After this, we will add Custom Code that will contain all the logic required to obtain the latest records and also remove any deleted records.
Step 1:
Create tables, triggers, and records in Source Database. Sample code is available here.
Step 2:
Create Elasticube by adding both tables and selecting deleted_on column as accumulated by for audit table and updated_on for fact_sales table. Then build using “BY Table”
(Note: The audit table will be empty since we haven’t deleted any records yet)
Step 3:
- Create Custom Code Table
If not enabled, go to Admin > Feature Management > Custom Code and save.
- Select Create your own Notebook
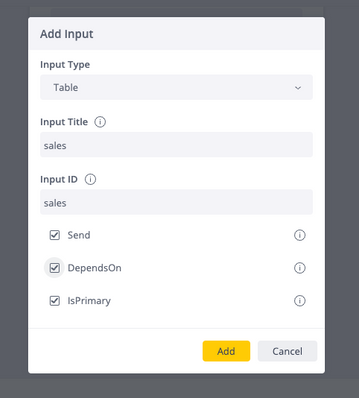
In the input parameter, add both base tables, making sure you select the correct parameters and add columns for the output schema. Then hit the open code editor to open a jupyter notebook in a new tab where you will be able to add the logic.
- Once the jupyter notebook is open, clear all the cells and copy-paste the code from the .ipynb file from the repo.
- Make changes to the notebook based on your use case. For example, if the Elasticube and table names are different, provide them in cell 2.
- For this example, the date_change_threshold is the parameter we are choosing to restrict.
- Save the notebook, return to the previous tab, select the table for input parameters, and click done to create a new Custom Code table in Elasticube.
- First Build Changes Only which will create the data for the Custom Code Table
Step 4:
Insert a new record, update an old record, and/or delete a record from the Fact Sales table in your data source.
The update trigger will change the Updated_On value for id 9 while the delete trigger will create a new record in the Audit Table
Step 5:
Build the Elasticube by selecting “By Table”. Now, in the Elasticube you have a fact_sales table which contains all the history/changes of the record and the Custom Code table which has the latest record that are in sync with the data source table.
Example below of Table capturing all data changes:
Example below of Table in-sync with data source:
These steps should result in accurate data in your Elasticube leading to smarter business decisions. Please note, this is one possible workaround for users with similar use cases. Keep in mind that editing the jupyter code is another possibility. For example, you can try to use dask dataframe instead of pandas and see which performance is better with your data.
Disclaimer: Please note, that this blog post contains one possible custom workaround solution for users with similar use cases. We cannot guarantee that the custom code solution described in this post will work in every scenario or with every Sisense software version. As such, we strongly advise users to test solutions in their own environment prior to deploying them to ensure that the solutions proffered function as desired in their environment. For the avoidance of doubt, the content of this blog post is provided to you “as-is” and without warranty of any kind, express, implied or otherwise, including without limitation any warranty of security and or fitness for a particular purpose. The workaround solution described in this post incorporates custom coding which is outside the Sisense product development environment and is therefore not covered by not covered by Sisense warranty and support services.


