- Community
- Knowledge Base
- BloX - Date and Timestamp Range Filter
- Subscribe to RSS Feed
- Mark as New
- Mark as Read
- Bookmark
- Subscribe
- Printer Friendly Page
- Report Inappropriate Content
- Subscribe to RSS Feed
- Mark as New
- Mark as Read
- Bookmark
- Subscribe
- Printer Friendly Page
- Report Inappropriate Content
on
11-08-2022
01:33 PM
- edited on
03-02-2023
10:14 AM
by
intapiuser
Sisense doesn't currently support filtering on timestamps natively. This article shows how we can leverage BloX to work around this limitation and allow users to select a date and timestamp range to filter their dashboards. (This is an updated version of this old community article, shout out to Kaitleen Crowe!)
1. Create a numeric date-time column in the data model
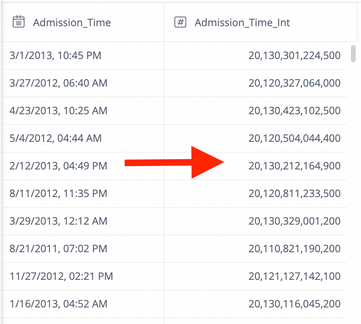
The goal here is to convert the date-time field you wish to filter by to a BIGINT in the format of YYYYDDMMHHMMSS. Let's break that down.
- Choose your date-time field to convert.
- Create a new custom column in the same table.
- Convert the date-time field to a BigInt with the format YYYYDDMMHHMMSS.
- Your values should not have '/' or '-'. If you have these characters, they will need to be parsed out.
Example:
In this example we will be converting the [Admission_Time] field into a custom column [Admission_Time_Int] as a BIGINT. **Note: Your date formats can vary so the method to convert will vary as well.
-- Changing datatype to  bigint

toBigInt(

--formatting date

replaceAll(StrParts(toString([Admission_Time]), ' ', 1), '-', '')  +

-- formatting time

replaceAll(left(SubString(toString([Admission_Time]), 12), 8), ':', ''))
2. Add BloX widget to the dashboard
- Add a new BloX widget to your dashboard.
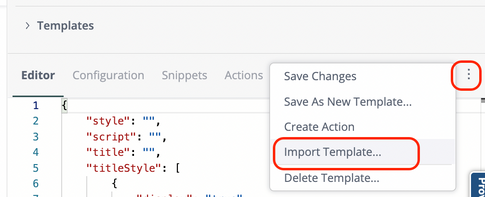
- Upload the BloX template attached in this article (file DateTimeFilter-2022-11-08.json) to your instance like shown in the screenshot below.
- Once the template is loaded in your Editor tab, scroll to the ActionSet and under actions, change the NumDateTimeColumn value to the name of the table and column of the numeric date-time that you created in the first step. The format is tableName.columnName.
3. Create a new custom action
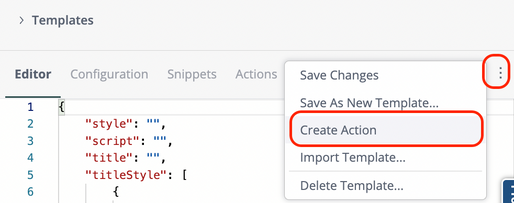
- Create a new BloX action like shown below.
- Copy and paste the Javascript code below into the custom action editor:
var datetimeCol = payload.data.NumDateTimeColumn;
var dash = payload.widget.dashboard;

//grab the start date and start time and parsing values
var dt1 = payload.data.datevalstart;
dt1 = dt1.substring(0, 4) + dt1.substring(5, 7) + dt1.substring(8);
var t1 = payload.data.timevalstart;

if (t1 == '') {
    t1 = '00:00';
}

t1 = t1.substring(0, 2) + t1.substring(3);
var dtstart = parseInt((dt1 + t1 + '00'), 10);

//grab the end date and end time and parsing values
var dt2 = payload.data.datevalend;
dt2 = dt2.substring(0, 4) + dt2.substring(5, 7) + dt2.substring(8);
var t2 = payload.data.timevalend;

if (t2 == '') {
    t2 = '23:59';
}

t2 = t2.substring(0, 2) + t2.substring(3);
var dtend = parseInt((dt2 + t2 + '00'), 10);

//create JAQL filter definition
let newFilter = {};

newFilter = {
    jaql: {
        dim: "",
        filter: {
            from: dtstart,
            to: dtend
        }
    }
}

//apply the filter
datetimeCol.forEach(function (dim) {
    newFilter.jaql.dim = dim;
    dash.filters.update(newFilter, { refresh: true, save: true })
})
- Name the action DateTimeSelector (or any other name you'd like), press Next then Create to save the new action. If you choose to give the action a different name, do the following additional steps:
- Copy the name of the new action.
- Click the Editor tab.
- Scroll to the ActionSet and under actions, change the type to the name of the action you created.
4. Add the numeric Date-Time column to the dashboard filter panel.
- Add the numeric date-time column you created in the first step to the dashboard filter panel.
- When adding this filter, go to the Values tab and select the 'Between' option
- Press OK.

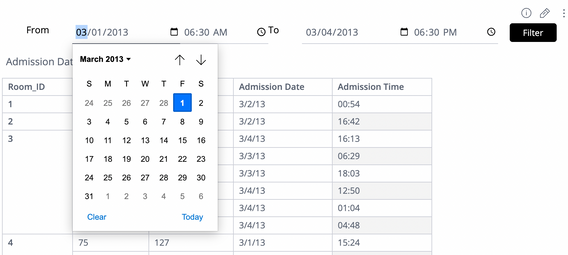
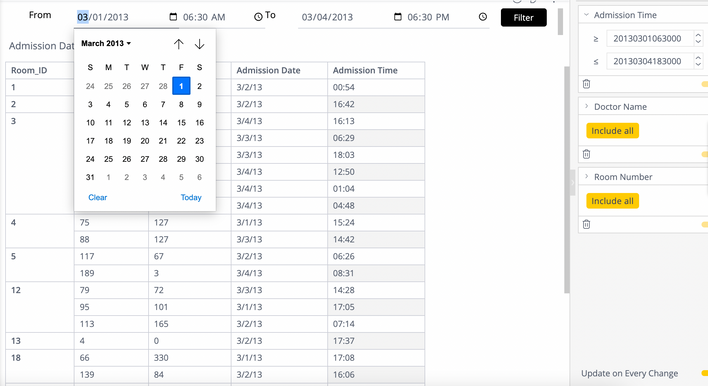
You now have a selector for date and time. Select a date and time in the picker input fields and press the Filter button.
5. Improve User Experience by making the input fields remember previous selection
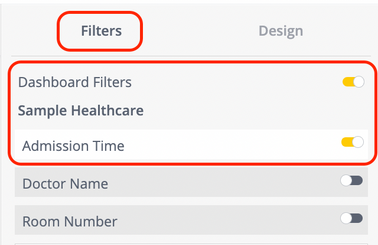
You will notice that after you hit the Filter button, even though your selection has been applied to the dashboard filter, the BloX widget will refresh and your previous selection will be wiped from the date and time selectors. To prevent this, you can turn off dashboard filters in the BloX widget setting. Open the BloX widget, go the Filters tab on the right panel, then turn off the Dashboard Filters option. Once this option is turned off, the BloX widget will not refresh when you hit the Filter button.
Note that after a page/dashboard reload, the BloX widget will still refresh and wipe the previous selection from the date and time input fields.
If you'd like to further improve the User Experience by having the date and time input fields to remember the previous selection even after a page refresh, follow these steps:
- Open the BloX widget.
- In the Filters tab on the right panel, turn the Dashboard Filters option back on. Turn on only the numeric date-time filter and leave every other dashboard filter turned off.
- Click Apply and then open the BloX widget again.
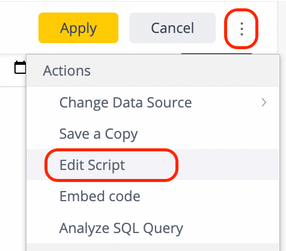
- Open the widget script editor by click the three-dot menu of the widget, then click Edit Script.
- Copy and paste the Javascript code below into the widget script editor.
//***** Populate input boxes with current filter values *****/
widget.on('ready', function() {

	//replace with filter name
	var filterName = "Admission Time";

	// ----------Find date filter----------
    let dateFilter = dashboard.filters.$$items.find((item) => {
        if (item.jaql && item.jaql.title.indexOf(filterName) !== -1) {
            return true
        }
    })

	//get the current 'from' filter value and parse it into date / time format
	var fromDateTimeString = String(dateFilter.jaql.filter.from);
	var fromDate = fromDateTimeString.slice(0,4) + '-' + fromDateTimeString.slice(4,6) + '-' + fromDateTimeString.slice(6,8);
	var fromTime = fromDateTimeString.slice(8,10) + ':' + fromDateTimeString.slice(10,12);// + ' ' + fromAMPM;

	//check if current 'from' filter value is a valid date / time
	var checkInvalid_from = typeof dateFilter.jaql.filter.from == 'undefined' || dateFilter.disabled == true;
	var filterDateValue_from = (checkInvalid_from) ? 'someInvalidDate' : fromDate;
	var filterTimeValue_from = (checkInvalid_from) ? 'someInvalidTime' : fromTime;

	//set the current 'from' filter value as placeholder and default value for input field
	$('#datevalstart', element).attr('value', filterDateValue_from);
	$('#timevalstart', element).attr('value', filterTimeValue_from);

	//get the current 'to' filter value and parse it into date / time format
	var toDateTimeString = String(dateFilter.jaql.filter.to);
	var toDate = toDateTimeString.slice(0,4) + '-' + toDateTimeString.slice(4,6) + '-' + toDateTimeString.slice(6,8);
	var toTime = toDateTimeString.slice(8,10) + ':' + toDateTimeString.slice(10,12);// + ' ' + fromAMPM;

	//check if current 'to' filter value is a valid date / time
	var checkInvalid_to = typeof dateFilter.jaql.filter.to == 'undefined' || dateFilter.disabled == true;
	var filterDateValue_to = (checkInvalid_to) ? 'someInvalidDate' : toDate;
	var filterTimeValue_to = (checkInvalid_to) ? 'someInvalidTime' : toTime;

	//set the current 'to' filter value as placeholder and default value for input field
	$('#datevalend', element).attr('value', filterDateValue_to);
	$('#timevalend', element).attr('value', filterTimeValue_to);

});
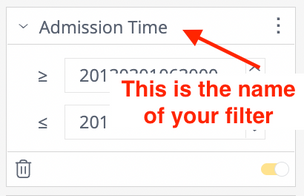
- Replace the var filterName value in the script (line 5) with the name of your date-time dashboard filter.
- Click Save. Go back to your dashboard and refresh the page.
- Your BloX date and time selectors should now be populated with the current filter values, i.e. the values you previously selected.
- Mark as Read
- Mark as New
- Bookmark
- Permalink
- Report Inappropriate Content
Looking at the template, why do you add a column before the "From" column with a blank style? I was trying to replicate what you are doing, and found that without that blank column, styles did not get applied. Was curious if you knew why?
- Mark as Read
- Mark as New
- Bookmark
- Permalink
- Report Inappropriate Content
Hi @bpeikes, the empty column was added to add an additional space to the left of the “From”, it’s purely for aesthetic reason. There are other ways to add the space too, like adding margin to the styles. Without that empty column, the other styles should still be applied, although the elements may not look as well-aligned.
- Mark as Read
- Mark as New
- Bookmark
- Permalink
- Report Inappropriate Content
Interesting. I see that the column is not needed. That said, I tried removing it and relying on the style on the TextBlock (as shown below, text taken from the template attached to this article, but it does not appear to center the "From" label.
"style": {
"justify-items": "center",
"align-items": "center"
}
I also can't seem to control absolute width of the columns. How would you do that?
- Mark as Read
- Mark as New
- Bookmark
- Permalink
- Report Inappropriate Content
- Mark as Read
- Mark as New
- Bookmark
- Permalink
- Report Inappropriate Content
Thanks! I was putting that into the style for the Column. How do you know which features you can put into the style, and which ones are direct attributes? I was looking at the documentation, (link below), and there is no mention of "width". Which objects support setting the "width" attribute?
https://documentation.sisense.com/docs/sisense-blox-reference
- Mark as Read
- Mark as New
- Bookmark
- Permalink
- Report Inappropriate Content
I've also tried adding "spacing" to the "ColumnSet" item, but it does not appear to put any spaces between columns. How would you get spacing between columns, do you have to add a column? It seems like spacing should do that.
- Mark as Read
- Mark as New
- Bookmark
- Permalink
- Report Inappropriate Content
Love this post! @TriAnthony My question for this post is how do i change the display format to an ISO date of yyyy-mm-dd vs the mm/dd/yyyy for the input fields.
- Mark as Read
- Mark as New
- Bookmark
- Permalink
- Report Inappropriate Content
Hi @hvibberts, the date values in the input fields are actually stored in ISO format (yyyy-mm-dd). However, how they are displayed depends on your computer/browser settings. For example, you can change the date format on a Mac in the System Settings -> General -> Language & Region.
Once this is set to 'yyyy-mm-dd', the dates in the input fields will be shown in that format, as shown below.
If you're thinking of enforcing this format to all users of the dashboard without them having to change their computer/browser settings, we'll need to change the input fields' type from Date to Text. The main drawback of this option is users will have to manually type the dates since the calendar date picker does not show up for text input fields.
-Tri
Recommended Quick Links
- Community FAQs
- Community Welcome & Guidelines
- Discussion Posting Tips
- Partner Guidelines
- Profile Settings
- Ranks & Badges
Developers:
Product Feedback Forum:
Need additional support?:
The Legal Stuff
Have a question about the Sisense Community?
Email [email protected]
