Create A New Plugin
INTRODUCTION
Sisense has a very rich and robust plugin framework that allows users to extend the core functionality beyond what is available with the out-of-the-box Widget. There are many ways to extend Sisense functionality; however, in this document will focus on creating a new plugin via the plugin framework.
This document provides an overview on how to create a Custom Plugin using a JavaScript plugin framework.
Plugin Location Folder
Sisense stores all custom plugin in the following folder C:\Program Files\Sisense\PrismWeb\plugins . Each customer plugin will be placed in a separate directory that will include at minimum the following files:
- json
- js
- css
- Widget icon file in PNG format
GETTING STARTED
The best way to get started, is to copy the files from an existing custom plugin folder to a new directory and edit the properties of each file based on your custom requirements.
Plugin.json
This file acts as the main project file, which will have information file included within this project. Normally this will be widget.js, but other files can be added such as external libraries or third party code. This file will also include references to the plugin stylesheet file Widget.css.
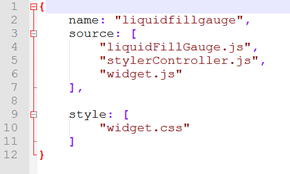
The below example shows what the Plugin.json file would look like. Notice that “widget.js” and “widget.css” must be there by default. The other files (liquidFillGauge.js, stylerController.js) are additional library that the plugin will reference.
Widget.js
This is the main plugin file where all the magic happens. The file has several sections that will need to be customized in order for the plugin to work. The sections that need to be customized are the following:
- Plugin general properties
- Plugin input parameters (also called Panels)
- Plugin Query
- Processing Results
- Render
1. Plugin General Properties
- Name - the internal name of the plugin within the Sisense framework to be used to register the plugin. There are 2 places that will need to be modified as seen below:

- Family - indicates the family type for this plugin and generally can be any text. Some examples for family types are : Indicator, tree, chart, pivot, etc. See below example:

- Title - displays the title of the plugin when user is making selection from the Dashboard designer. See below example:

- iconSmall - points to the location of the plugin icon. This should be a PNG file of size 24x48 to hold the 2 24x24 icons of the plugin (selected and unselected), see below examples of an iconSmall file:

2. Plugin Input Parameter
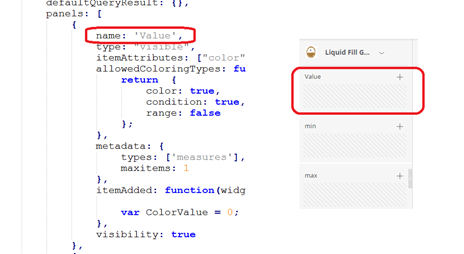
The plugin input parameter, also known as panel, is where user selects which fields or formula to source the data from. The plugin has a “panel” object that is an array of all the input parameters. In the below example the plugin has implemented 3 parameters (Value, Min, and Max). The below illustrates the code for declaring the “Value” panel and what it would look like in the design mode:
Panel Properties
- Name - name of the input parameter
- Type - should be set to “visible”
- itemAttributes - define the option the user will have to set any special formatting attribute to a specific panel such as number or color formatting
- Metadata - defines the type of value that is allowed for this parameter. It can be measures or dimensions.
- Visibility - set to true to make this parameter visible by default.
3. Plugin Query (buildQuery)
This section will push all the plugin parameters, as well as any filters into the Plugin JAQL object. This query will be send to Sisense server for execution and will be returned in the ProcessResult event as described below.
In general, the below function will create a query object, and will push all the panels values into it as seen below. The below code will work for most cases, and you just need to modify the panel name accordingly:
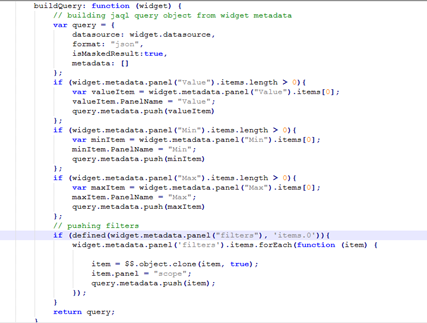
4. Processing Result (processResult)
This event will get fired after the above query was executed by Sisense server allowing the user to process the results of the query and create the queryResult object that is more suitable for processing.
This event will get fired after the above query was executed by Sisense server allowing the user to process the results of the query and create the queryResult object that is more suitable for processing.
Sisense will return a dataset that is in a tabular format based on the input parameter that is accessible via the $$rows object. Each row item will contain values corresponded to the input parameters. In the below example, the result set will only have one value (i.e. number of rows will always be 1), so we only need to loop through all the input parameters that have value and fetch the value from the first row accordingly:
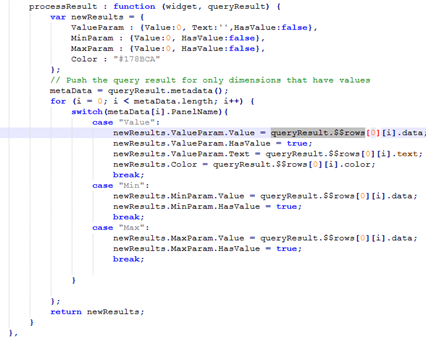
Once we have created our own result set, we must return this object before exiting the function. This will be saved to the widget.queryResult object and will used when rendering the plugin display.
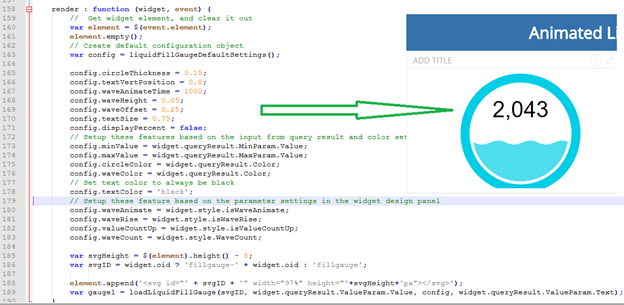
5. Render
This event is called after the processResult event (as described above). In this event we will have the chance to output any visual to the user on the plugin display panel. This can be a simple textbox or a table, or more advanced visualization using D3 as an example to plot the dataset.
We would need to access the plugin output display and this is possible using the below code where we get access to the element property:

Next, we would want to clear any previous display by calling the element.empty() method as seen below. This will result in having a blank canvas ready to be refreshed with our new dataset.
We can also fetch some basic properties of our canvas such as height and width, that can be used to align our drawing to the plugin canvas size. In most cases we would need to add a new SVG element to our canvas using the element.append function as seen below:

This will create a new container in the plugin canvas which we can use to draw any visualization as seen below:
To summarize, this document covers the steps needed to create a basic custom plugin within Sisense. This document does not cover any of the advanced techniques, such as creating design options, custom queries, and other.
Once you have a fully functional plugin, it’s time to share your work with others in the Sisense community.
Updated 02-07-2024
intapiuser
Admin
Joined December 15, 2022